To copy manual trades from TradingView to several Tradovate accounts, select your admin Tradovate account in PickMyTrade, add and activate the sub-accounts, and set a quantity multiplier. Then place a market order in TradingView with take profit and stop loss, and the copier repeats it on every linked account. Only one admin account is supported.
1. Introduction #
This guide explains how to use the PickMyTrade Trade Copier to replicate manual trades from TradingView to multiple Tradovate accounts. You can use this for both personal and client accounts.
Ready to automate this with PickMyTrade? Connect TradingView to Tradovate and start executing trades automatically — no coding required.
Currently, only one admin account is supported for copier trading.
For a visual walkthrough, refer to the accompanying video: #
2. Setting Up Trade Copier in PickMyTrade #
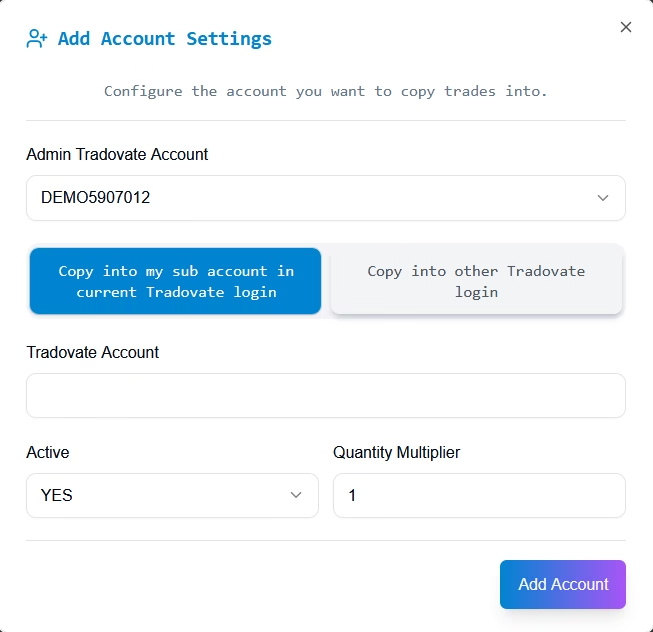
2.1 Copy Trade into a Sub-Account within the Current Tradovate Login #
To copy trades within your existing Tradovate login, follow these steps:
Step 1: Select the Admin Tradovate Account #
Choose the main account from which you want to copy trades.
Step 2: Add Sub-Accounts #
Specify the Tradovate sub-accounts where trades will be copied.
Step 3: Activate Copy Trading #
Ensure the sub-account is active.
Step 4: Set the Quantity Multiplier #
– Multiplier = 1 → Trade size remains the same as the main account.
– Multiplier = 2 → Trade size doubles in the sub-account.
2.2 Copy Trade into Another Tradovate Login #
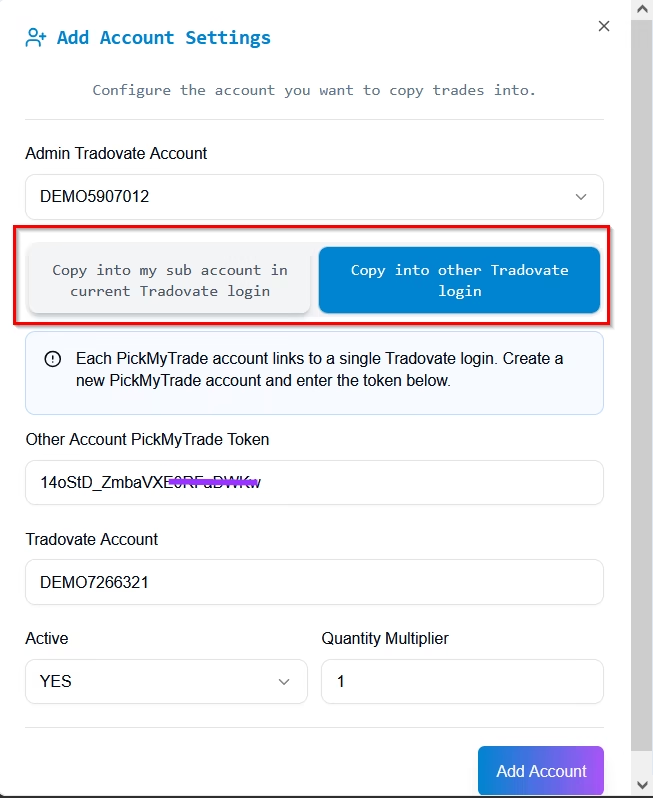
If you want to copy trades into a different Tradovate login, follow these steps:
Step 1: Create a New PickMyTrade Account #
Each PickMyTrade account is linked to a single Tradovate login. To connect to another Tradovate account, create a new PickMyTrade account.
Step 2: Enter the PickMyTrade Token #
Input the token associated with the other Tradovate account in the designated field.
Step 3: Add and Activate the Tradovate Account #
Ensure the account is active.
Step 4: Set the Quantity Multiplier #
– Trade size remains the same.
– Trade size doubles.
Definitions:
Admin (Master) Account – The source of the original trade.
Client (Sub) Account – The destination account where the trade is copied.
3. Connecting TradingView to Tradovate #
Step 1: Open TradingView #
Step 2: Connect the Account #
Connect the account that will execute ltrades (e.g., demo34911458).
Step 3: Verify Monitored Accounts in Tradovate #
Ensure monitored accounts are open in Tradovate (Example: demo291396, demo36767).
Step 4: Adjust Quantity Multiplier #
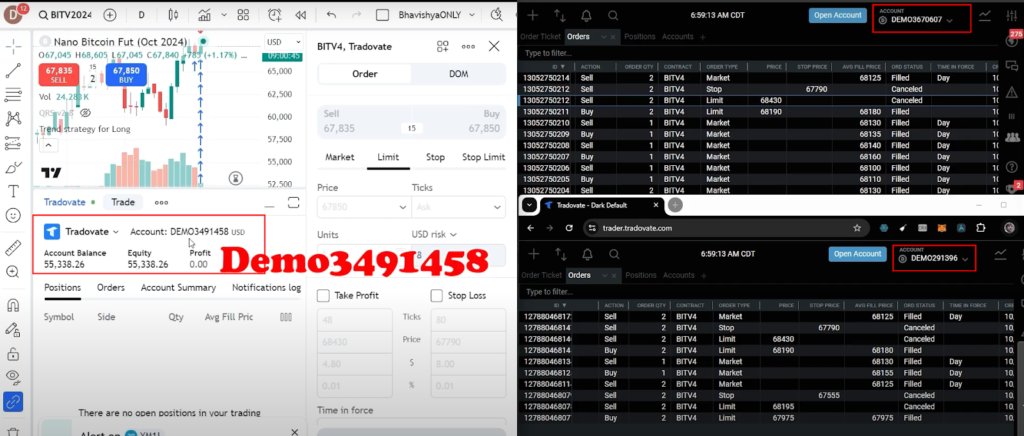
– Left Window (TradingView): Demo34911458 – Main Account
– Right Window (Tradovate): Demo291396, Demo36767 – Sub-Accounts
4. Placing Trades from TradingView #
4.1 Placing a Market Order #
Step 1: Place a Market Order on TradingView #
Step 2: Set Quantity, Take Profit (TP), and Stop Loss (SL) #
Step 3: Order Execution #
Note:
Bracket Orders (Take Profit + Stop Loss) are currently supported ONLY when the entry order is a Market Order.
Do not attach Brackets to Limit or Stop entries when using the Manual Trade Copier.
- When placed, a market order fills immediately.
- It automatically applies the Stop Loss and Take Profit levels.
- These are then copied to all linked accounts via the copier.
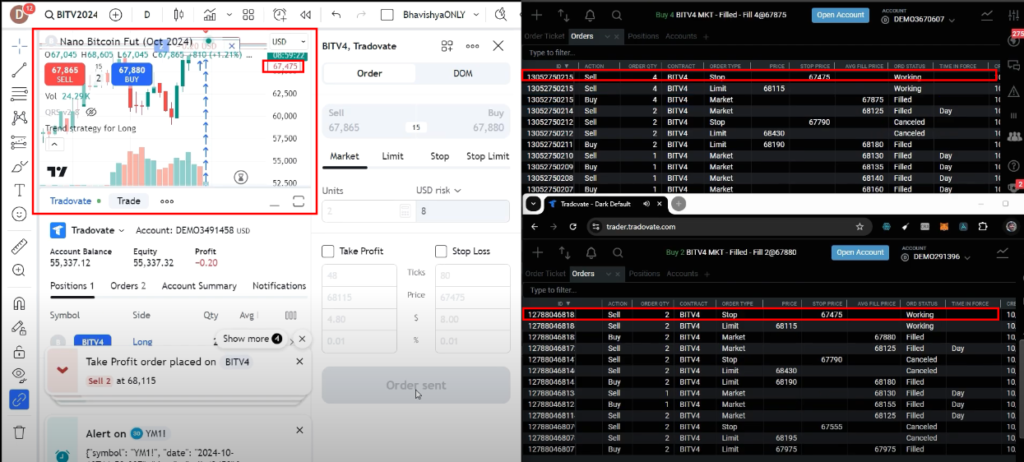
Left Window (TradingView): Demo34911458 – Order Filled
Right Window (Tradovate): Demo291396, Demo36767 – Order also filled in copy trade accounts
4.2 Example: Quantity Multiplier #
If Quantity Multiplier is set to 2:
- Source Account: 2 units – Master Account (TradingView)
- Sub-Account (demo291396): 2 units – First Client Account
- Sub-Account (demo36767): 4 units – Second Client Account
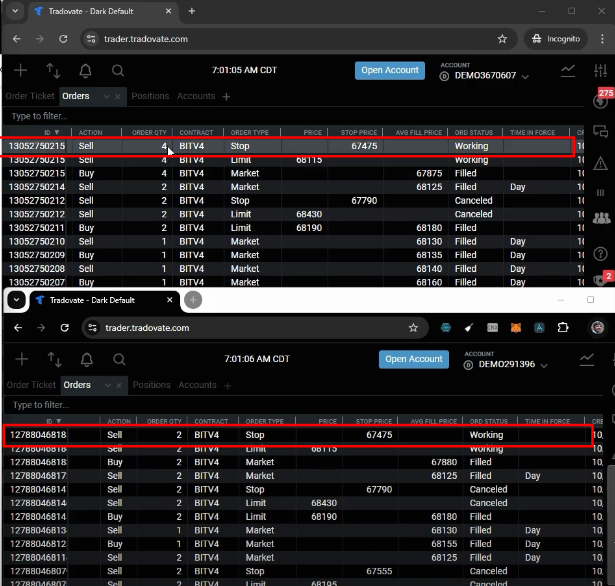
Sub-Account (demo291396): Receives 2 units
Sub-Account (demo36767): Receives 4 units (due to a multiplier of 2)
4.3 Canceling a Trade #
Canceling the trade in TradingView cancels it across all linked accounts.
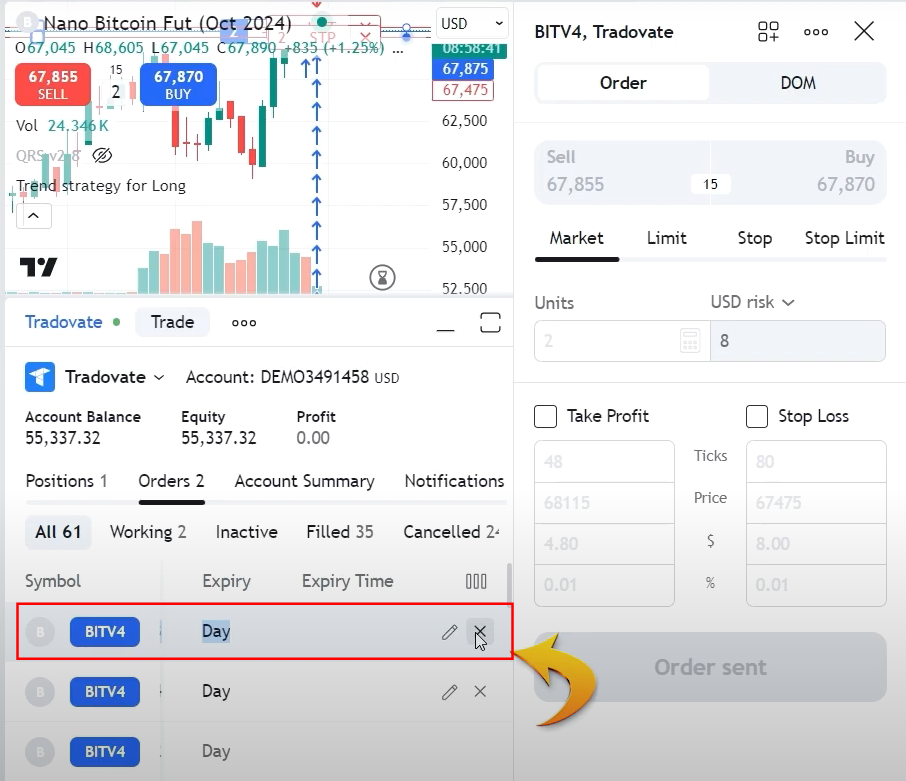
Main Account (TradingView): Order Canceled
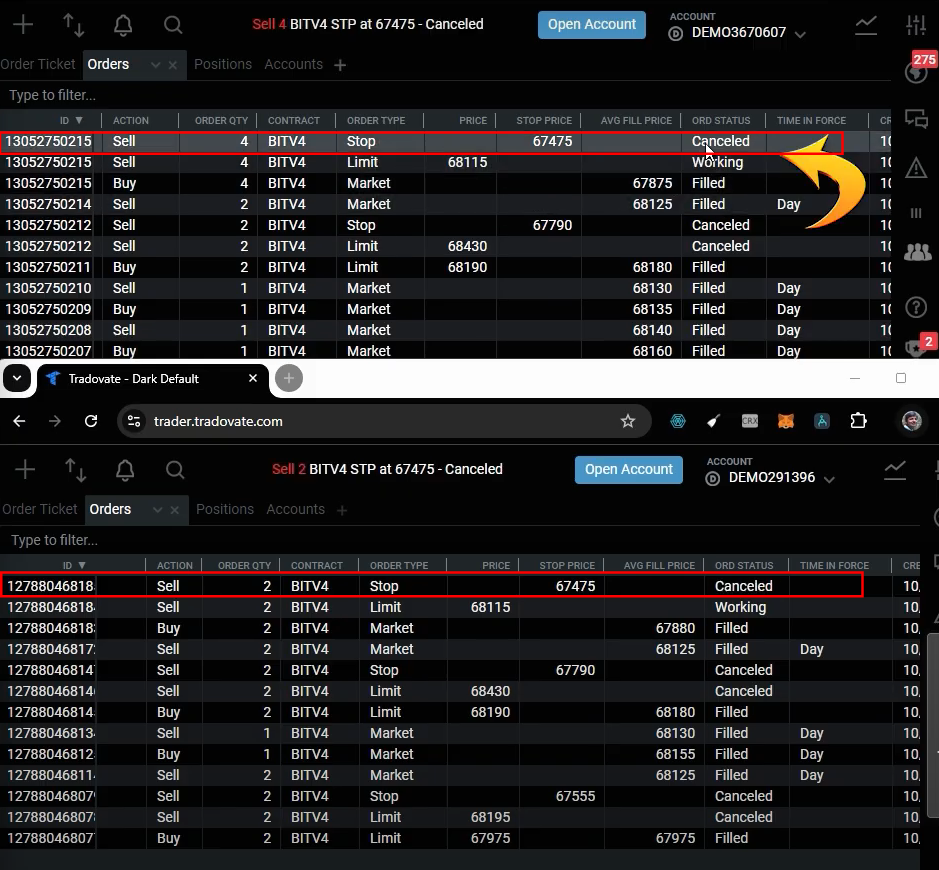
Sub-Accounts (Tradovate): Order Also Canceled
5. Placing a Sell and Limit Order #
Step 1: Place a Sell Order with Limit Entry #
Step 2: Define your Take Profit (TP) and Stop Loss (SL) levels. #
Step 3: The copier will automatically sync the trade with all linked accounts. #
Step 4: Modify the limit price if needed. #
Step 5: Changing price in TradingView updates all copied accounts. #
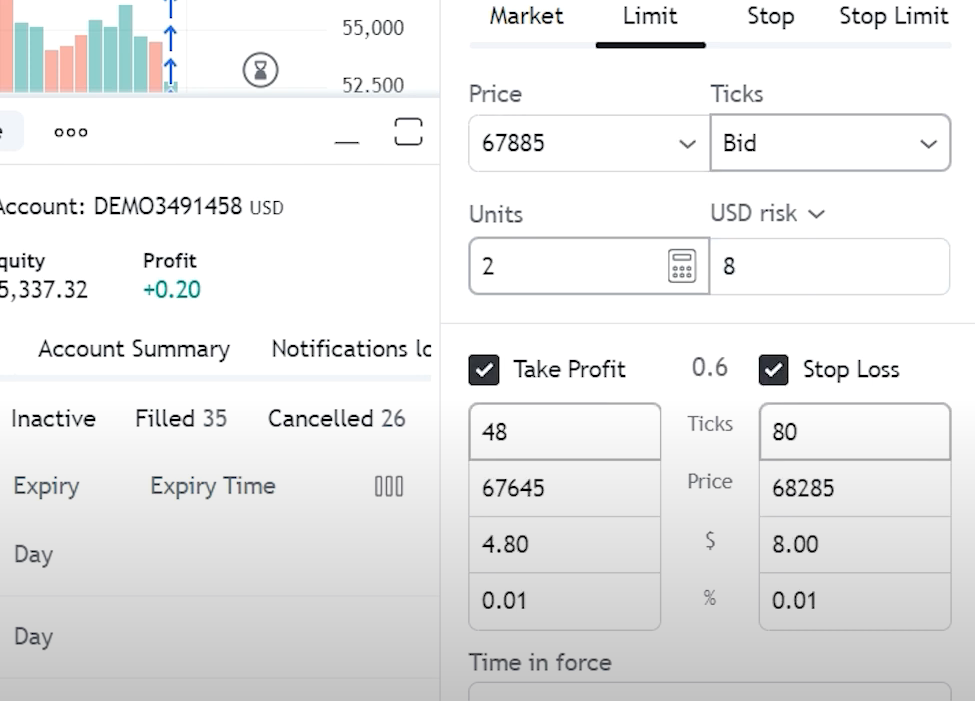
Master Account (TradingView): Placing Sell Limit Order
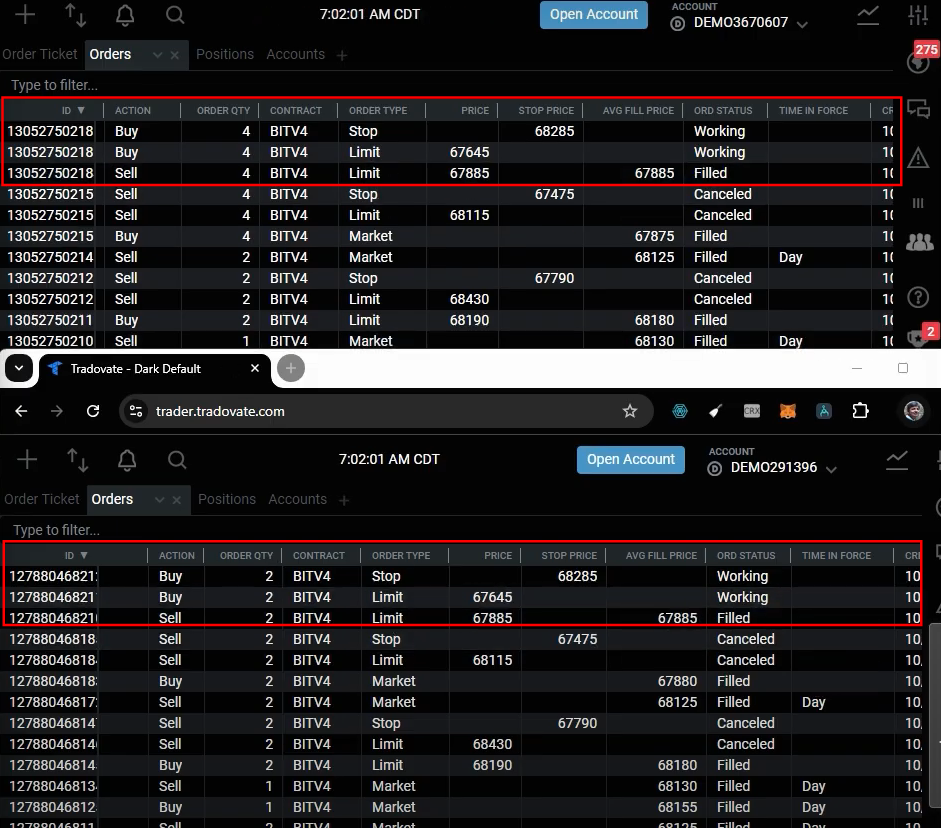
Similarly in Sub-Accounts (Tradovate): – Sell Limit Order Placed
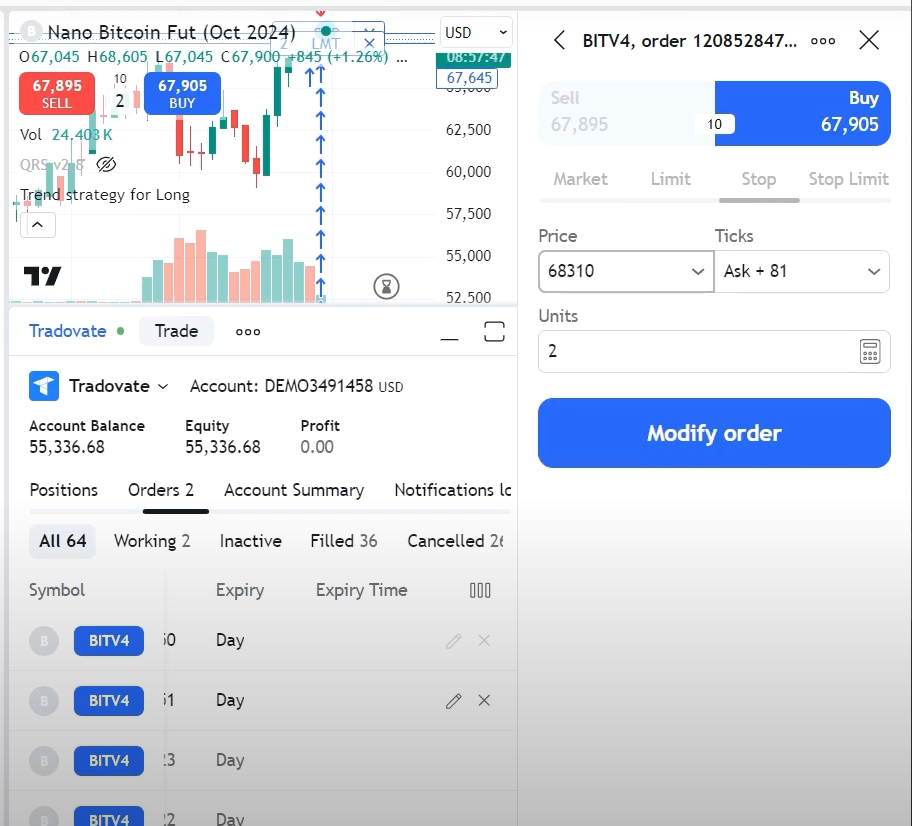
Master Account (TradingView): Order Modified
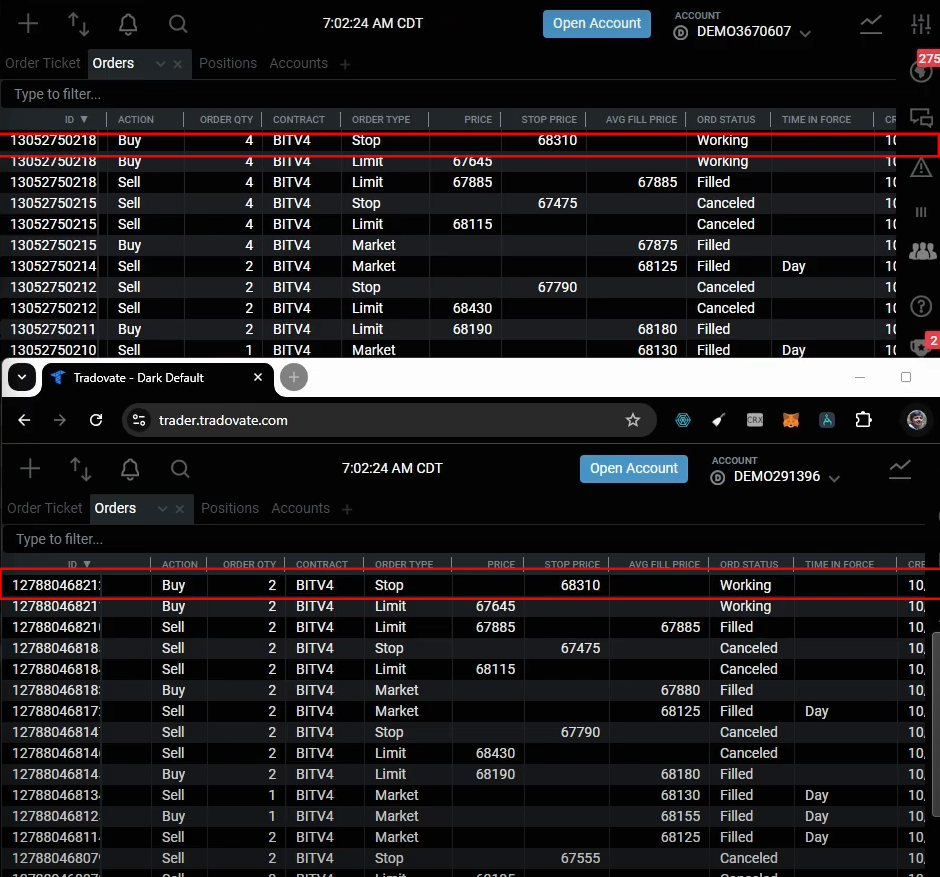
Sub-Accounts (Tradovate): Order Also Modified via Copy Trading
6. Managing Stop Orders #
6.1 Closing Positions and Orders #
- Stop Orders are supported.
- If entry is a stop order, it executes normally.
- If Take Profit or Stop Loss is omitted, only a limit order is placed.
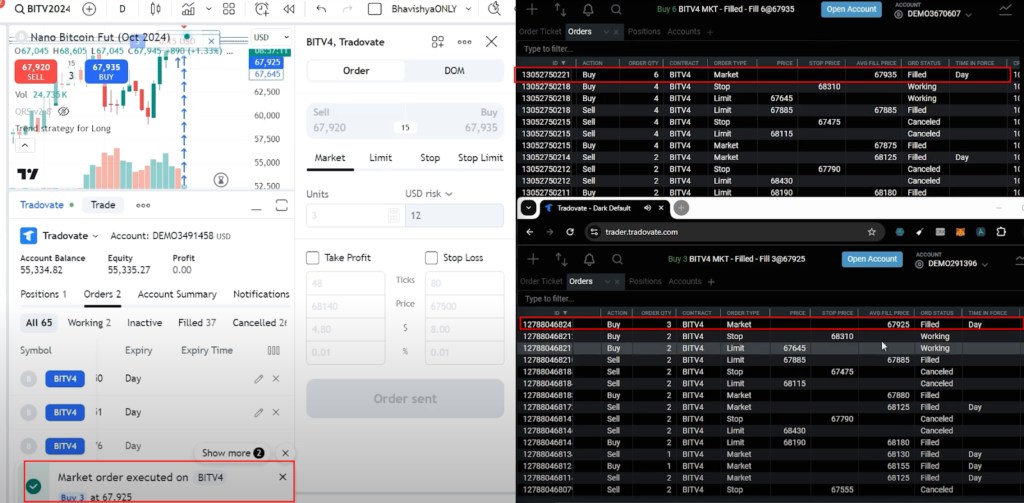
Master Account (TradingView): Executing Stop Order Without TP/SL
Sub-Accounts (Tradovate): Order Also Executed via Copy Trading
7. Managing Open Positions #
7.1 Closing Positions and Orders #
Step 1: Click Close Position in TradingView #
The copier will close positions across all accounts.
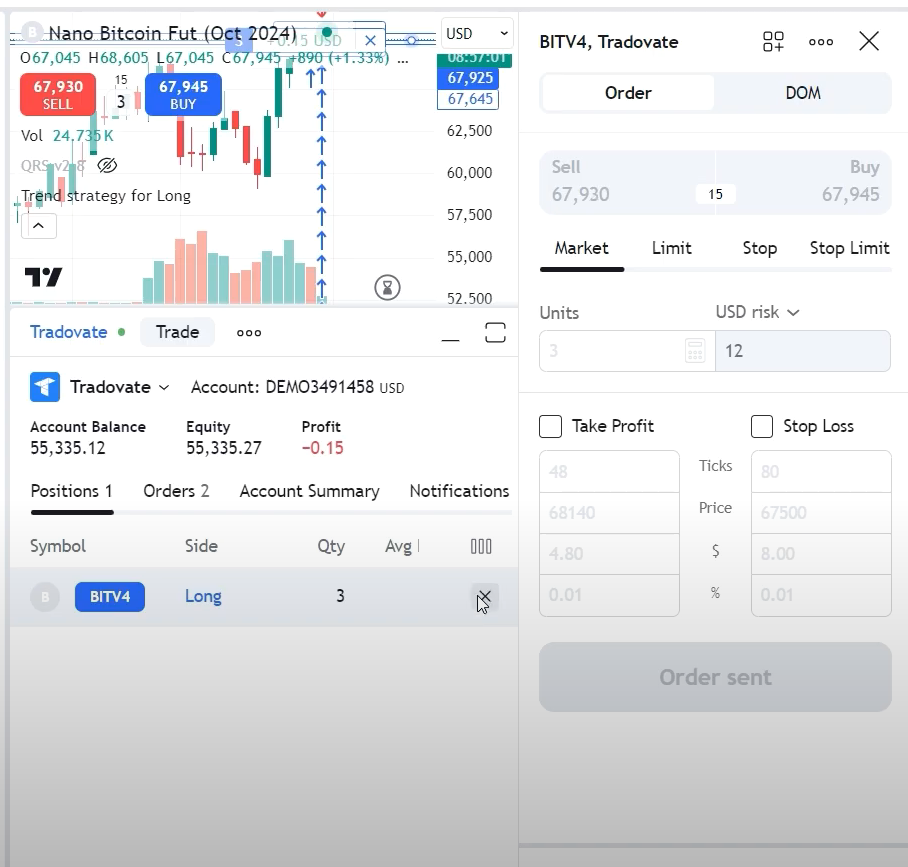
In the Master Account (TradingView), the order is first canceled and then closed.
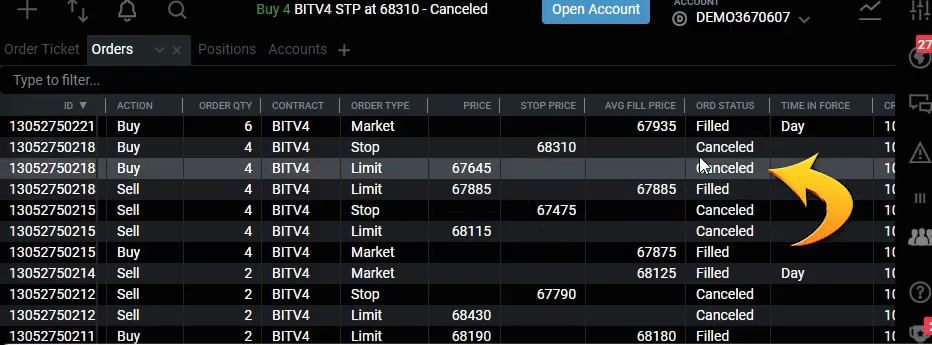
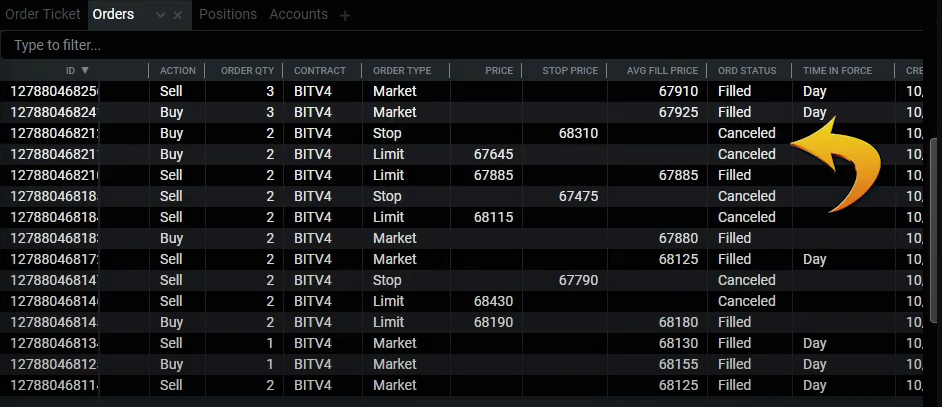
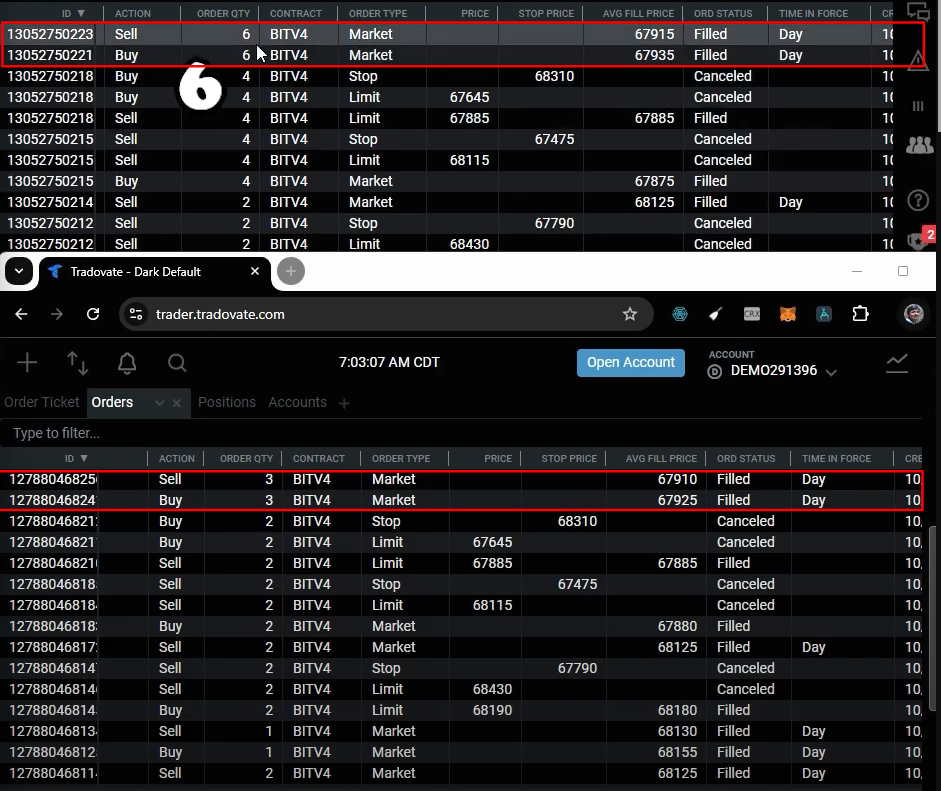
The Sub-Accounts (Tradovate) follow the same closing process automatically.
7.2 Stopping the Trade Copier #
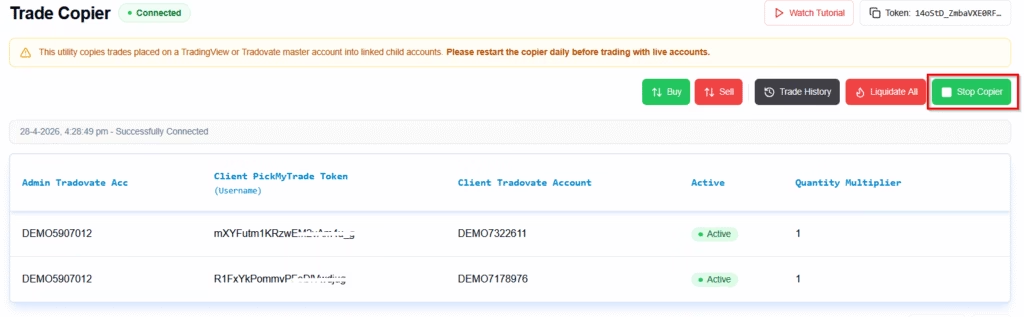
Finally, click Stop in PickMyTrade to halt trade copying. No new trades will be copied after this point.
8.1. Supported Order Types #
- Market Orders
- Limit Orders
- Stop Orders
- Stop-Limit Orders
- Take Profit and Stop Loss Orders (Bracket Orders – TP & SL are supported on Market, Limit, Stop, and Stop-Limit order entries)
- Manual Closing of Positions
8.2. Unsupported Order Types #
The following advanced order types are not currently supported by the TradingView → Tradovate Trade Copier and will not be copied or executed:
- Trailing Stop Orders — automated trailing stop logic (beyond basic stop loss).
- Break-Even Orders — automatic stop move to break-even conditions.
- Auto-Trail Orders — auto-trail behavior based on profit trigger and frequency.
- Multiple Take Profit / Stop Loss (Multi-Target) Orders — If you add multiple targets (Target #1, Target #2, etc.), each with its own Take Profit and Stop Loss, to a single Buy or Sell order using Tradovate’s Advanced order panel, the copier does not support this — only a single Take Profit / Stop Loss setup per trade is copied to linked accounts.
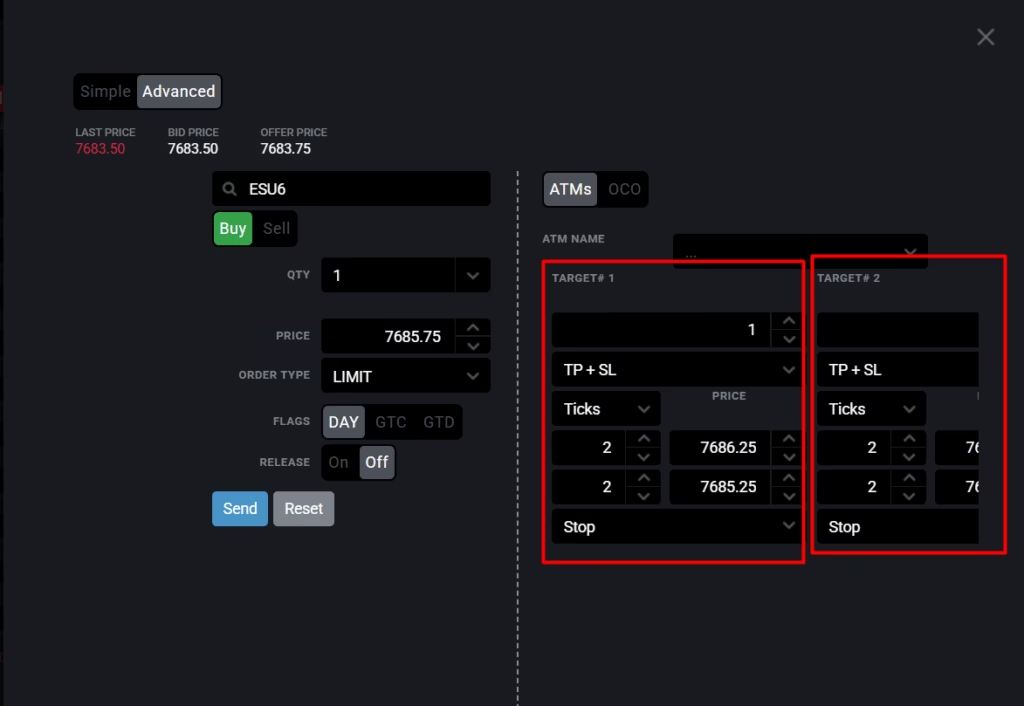
These order behaviors are not available through the copier even if they are supported by Tradovate itself. Only the core order types listed in Supported Order Types will be reliably replicated from TradingView to Tradovate.
9. Trade History & Execution Log #
9.1 Reviewing Trade History #
The Trade History tab provides a detailed breakdown of all executed trades.
9.2 Key Fields in Trade History #
| Field Name | Description |
|---|---|
| Master ID | Unique identifier for trade event. |
| Date Time | Timestamp of trade execution. |
| Slave Account ID | The account linked to execution. |
| Slave Order ID | Order ID generated for the trade. |
| Message | Status message (Success/Failure). |
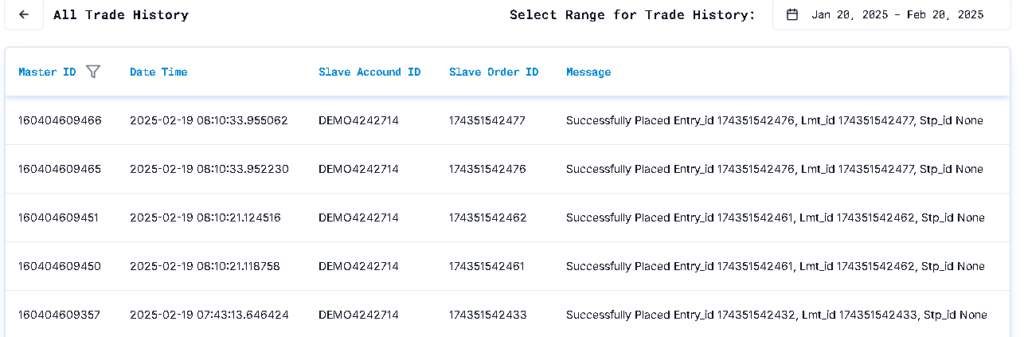
9.3 Example Trade Entries #
| Master ID | Date Time | Slave Account ID | Slave Order ID | Message |
|---|---|---|---|---|
| 160404609486 | 2025-02-19 08:10:33.955062 | DEMO4242714 | 174351542477 | Successfully Placed Entry_id 174351542476, Lmt_id 174351542477, Stp_id None |
| 160404609465 | 2025-02-19 08:10:33.952230 | DEMO4242714 | 174351542476 | Successfully Placed Entry_id 174351542476, Lmt_id 174351542477, Stp_id None |
| 160404609451 | 2025-02-19 08:10:21.124516 | DEMO4242714 | 174351542462 | Successfully Placed Entry_id 174351542462, Lmt_id 174351542462, Stp_id None |
9.4 How to Use Trade History #
- Review Executed Trades – Verify trade placements and timestamps.
- Troubleshooting – Analyze execution logs to debug potential errors.
- Reporting – Use trade history data for performance tracking and compliance checks.
10. Conclusion #
The PickMyTrade Trade Copier streamlines your trading operations by automatically copying trades from TradingView to Tradovate. With support for multiple accounts, custom quantity multipliers, and detailed execution tracking, it’s ideal for both personal and professional trading setups.
More Resources #
Want to automate trades on platforms beyond Rithmic, such as Interactive Brokers, TradeLocker, TradeStation, or ProjectX?
Explore all PickMyTrade setup guides
Using Tradovate instead?
View the Tradovate automation guide
Want the full trade-copier walkthrough?
See Tradovate trade copier on pickmytrade.trade
Last updated: September 30, 2026


