To automate a TradingView strategy on Tradovate, connect your Tradovate account to PickMyTrade, create a TradingView alert on your strategy with the PickMyTrade alert message and webhook URL, and test on a demo account first. TradingView decides when to trade and PickMyTrade places the order. Webhook alerts require a TradingView Pro, Pro+, or Premium plan.
1. Introduction #
Automating your TradingView strategies allows you to execute trades on Tradovate instantly—without manual intervention or coding. This guide walks you through the full setup using PickMyTrade, from prerequisites to a real trading example.
Ready to automate this with PickMyTrade? Connect TradingView to Tradovate and start executing trades automatically — no coding required.
Before You Begin #
Make sure you have the following ready before starting:
- TradingView account (Pro, Pro+, or Premium — required for webhook alerts)
- Tradovate account connected to PickMyTrade
- A TradingView strategy or indicator you want to automate
- PickMyTrade account with webhook access enabled
- Demo / Sim account for testing (strongly recommended before live trading)
Having these in place ensures a smooth setup and prevents common errors.
How the Automation Works (High-Level Flow) #
Here’s the complete automation workflow:
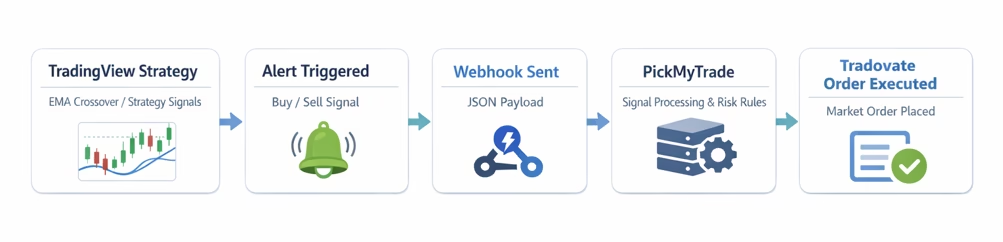
TradingView Strategy
→ Alert Triggered
→ Webhook Sent
→ PickMyTrade Processes Signal
→ Tradovate Order Executed
This means TradingView handles when to trade, while PickMyTrade handles how the trade is executed on Tradovate.
For a visual walkthrough, refer to the accompanying video:
2. Understanding TradingView Strategies Supported by PickMyTrade #
PickMyTrade supports three distinct strategy types for automation. The table below provides an overview of each strategy, its characteristics, and compatibility with Take Profit and Stop Loss settings in PickMyTrade.
| Strategy Type | Description | Automation Supported | Supports TP & SL? |
|---|---|---|---|
| Continuous Position Strategy | Maintains an open position (long or short) at all times. Exits the current position only when switching to a new one. Ensures constant market exposure with no downtime between trades. | Yes | Yes |
| Flat Position Strategy | Opens and fully closes a trade before entering a new one. No overlap of positions. Offers a cautious approach by ensuring previous positions are closed before initiating new ones. | Yes | Yes |
| Partial Exit Strategy | Uses multiple exit points (e.g., TP1, TP2) to scale out of a position. Partial profits are taken at different levels rather than closing the entire trade at once. Offers flexibility in volatile markets. | Yes | No (Currently Unsupported) |
2.1 Detailed Explanation of Strategies #
To generate alerts for automating a TradingView strategy or indicator, refer to the detailed setup instructions Click here. Below is a breakdown of each supported strategy type:
Continuous Position Strategy #
Maintains an active trade at all times.
When a new buy alert is received, it closes an existing sell position and opens a buy position (and vice versa).
Ideal for strategies that require uninterrupted market exposure.
Flat Position Strategy #
Ensures all positions are fully closed before initiating a new trade.
Prevents overlapping positions, reducing risk exposure.
Suited for traders who prefer distinct trade cycles without residual risk from prior positions.
Partial Exit Strategy #
Facilitates staged exits from a position using multiple profit-taking levels (e.g., TP1, TP2).
Provides flexibility to capitalize on market volatility by securing profits incrementally.
Note: Take Profit (TP) and Stop Loss (SL) management is currently unsupported for this strategy in PickMyTrade.
2.2 Strategy Market Position & Alert JSON #
By default, TradingView strategy alerts send the trade action using:
{{strategy.order.action}}– buy or sell
This is the default and recommended value used by PickMyTrade to execute trades.
Optional Change #
Users can update the alert JSON to use:
{{strategy.market_position}}– long, short, or flat
This value represents the expected position state after the signal is executed, not the trade action itself.
Important Note #
{{strategy.order.action}}tells PickMyTrade what trade to place{{strategy.market_position}}tells PickMyTrade what the final position should be
For most strategies, no changes are required and the default setup should be used.
3. Strategy-Based Trading Setup #
This section is tailored for traders utilizing a TradingView strategy that automatically generates buy/sell signals. Follow these steps to configure automation with PickMyTrade:
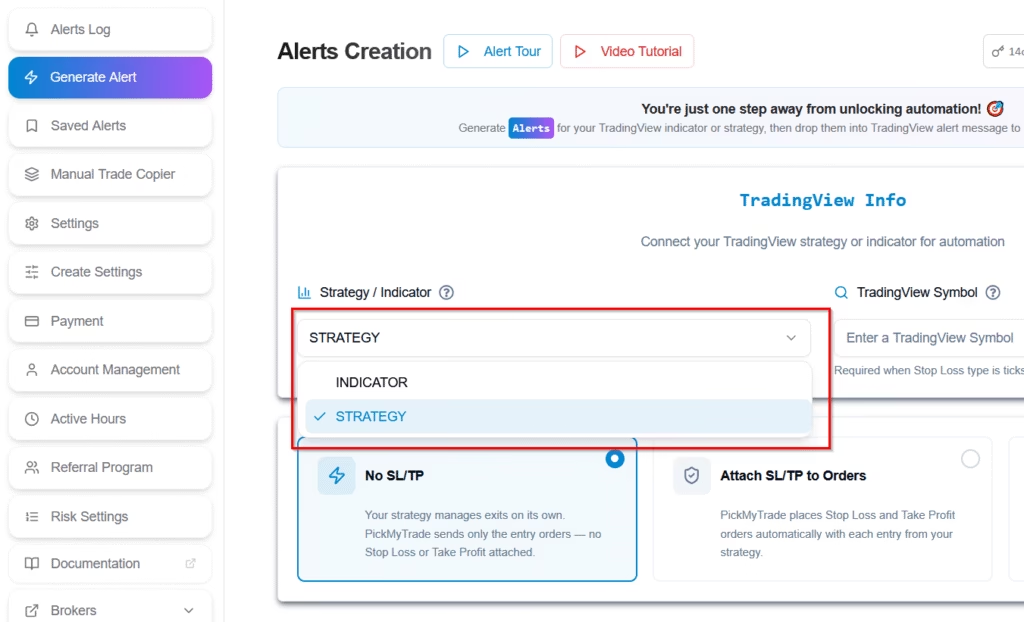
3.1 Select Your Strategy #
Choose the TradingView strategy you wish to automate. This will serve as the foundation for generating trade signals.
3.2 Enter Trading Symbol #
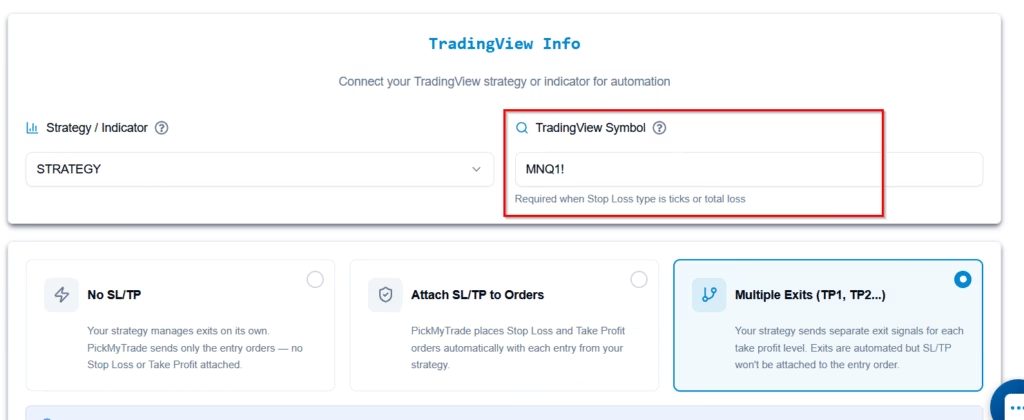
Specify the trading asset (e.g., MNQ, NQ) in PickMyTrade. This field is required for calculations involving Stop Loss based on ticks or total loss methods.
Important Considerations:
- If the symbol does not exist or is incorrectly mapped: You must configure it in PickMyTrade before trades can execute on that symbol.
- Trading a different symbol from the alert: PickMyTrade allows flexibility. For example:
If your TradingView chart uses NQ for the alert but you want to trade MNQ, enter MNQ in the PickMyTrade symbol field. - No symbol entered: If left blank, PickMyTrade defaults to the symbol of the TradingView chart associated with the alert.
3.3 Confirm Exit Handling #
Determine how exits will be managed for your strategy:
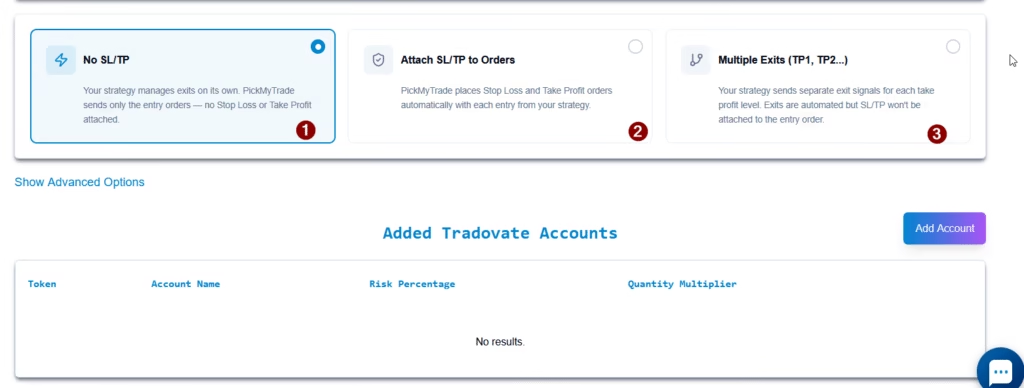
- No SL/TP : If your strategy fully manages exits via its own signals (no broker-side stop loss or take profit orders are attached).This means no protective stop loss or take profit orders are attached at the time of entry. Only the entry order is sent. The strategy determines when to exit trades based entirely on the TradingView signals generated by its own internal logic.
- Attach SL/TP to Orders : Use this if you want PickMyTrade to handle stop loss and take profit.→ SL/TP levels are attached directly to the order at execution. Use this option when you want PickMyTrade to handle simple and fixed risk management for your trades.
- Multiple Exits (e.g., TP1, TP2): Use this when your strategy already defines take profit and stop loss levels inside Pine Script and sends its own separate exit signals — for example, to handle partial exits or scaling out,you can automate it using PickMyTrade. In this case, all TP/SL logic is managed by the strategy itself, and no additional TP/SL configuration is required in PickMyTrade.
4. Generate Alert Code for Strategy Execution #
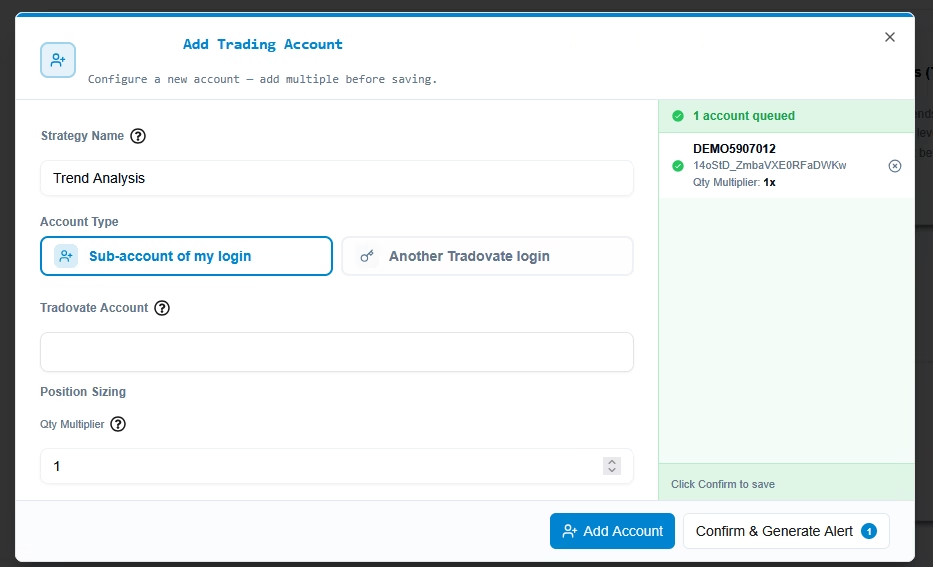
Once all accounts are added and configured, click Confirm & Generate Alert button.
Best Practices #
- Always test strategies in sim mode first
- Use clear, non-repainting strategies
- Avoid overlapping alerts on multiple timeframes
- Monitor logs in PickMyTrade during early runs
FAQ’s #
It means your TradingView strategy sends alerts via webhook to PickMyTrade, which then places trades automatically on your connected Tradovate account without manual execution.
You typically need a TradingView plan that supports webhook alerts, a connected Tradovate account, a PickMyTrade account, and a strategy that generates buy/sell signals. Testing on a demo account is strongly recommended first.
PickMyTrade supports continuous position strategies, flat position strategies, and partial exit strategies. However, TP/SL support may vary depending on the strategy type.
Yes. For example, a signal from NQ on TradingView can be mapped to execute trades on MNQ by entering the desired symbol in PickMyTrade.
Yes. If your strategy does not manage exits itself, you can configure stop loss, take profit, breakeven, and related risk controls inside PickMyTrade.
More Resources #
Want to automate trades on platforms beyond Rithmic, such as Interactive Brokers, TradeLocker, TradeStation, or ProjectX?
Explore all PickMyTrade setup guides
Using Tradovate instead?
View the Tradovate automation guide
See how this fits into PickMyTrade’s Tradovate automation.
Tradovate automation on pickmytrade.trade
Last updated: September 30, 2026


