The PickMyTrade account management system allows traders to manage multiple prop firm accounts under one login. Whether you’re working with clients or running several trading accounts, this guide will walk you through adding, accessing, and controlling each account efficiently.
Watch this short video on how to automate and manage multiple Tradovate accounts using PickMyTrade:
How to Access the Account Management Section #
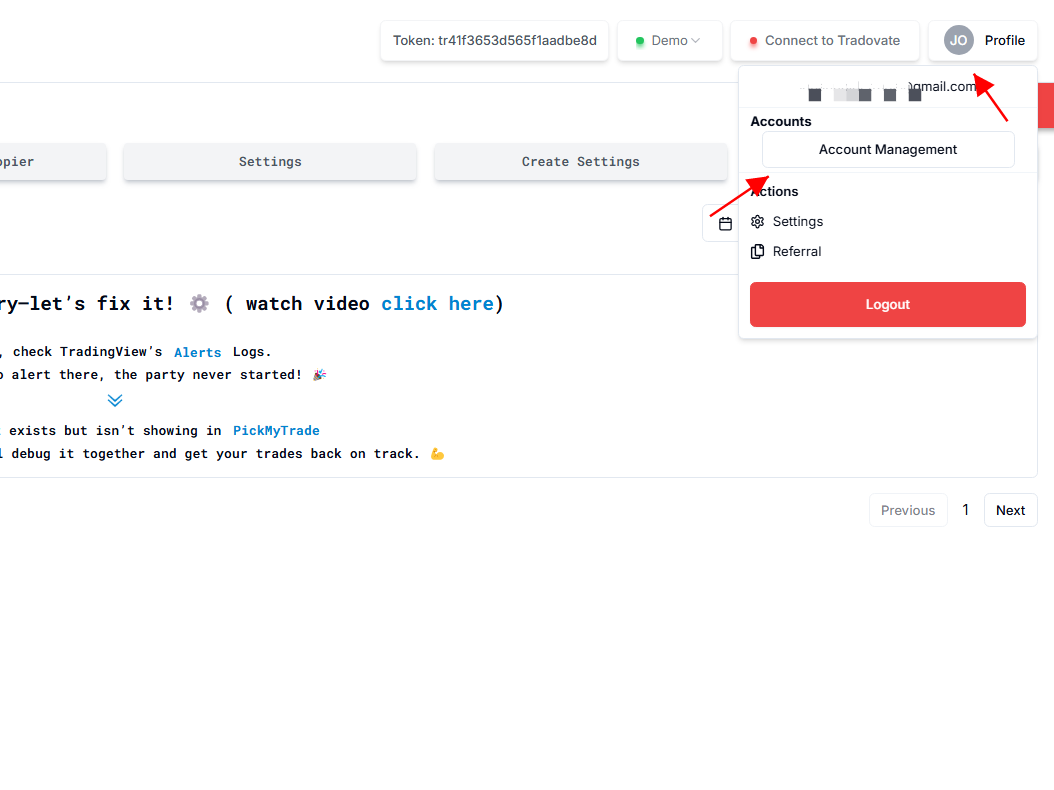
- Click on your Profile Icon in the top-right corner.
- In the dropdown menu, locate the “Accounts” section.
- Click on “Account Management” to access the dashboard.

From here, you can add new accounts, request access to existing ones, and manage linked accounts.
1. Adding New Client/Child Accounts #
Purpose: #
Create accounts for multiple clients using one of the following methods:
- Request Existing PickMyTrade Account Access (For clients who already have a PickMyTrade account).
- Add PickMyTrade Account Details (For new accounts that you create).
Steps for Adding a New Account: #
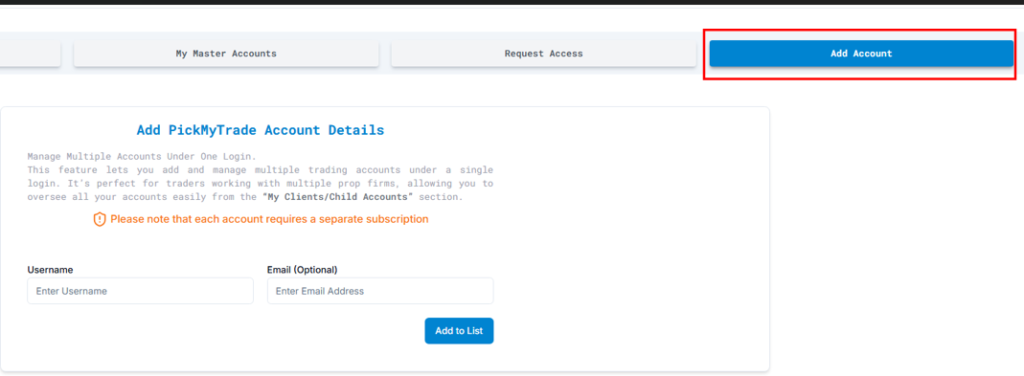
- Go to “Add Account” in your dashboard.
- Enter a Username (any name of your choice, must be unique).
- (Optional) Add an Email Address if needed.
- Click “Add to List” to create the account.

Important Verification Notes: #
- If no email is added: The verification emails for the newly created client accounts will be sent to your registered email address.
- If an email is added: The verification email will be sent directly to the entered email address at the time of account creation.
Approval Requirement (For Email Accounts): #
Whenever you add a new account using an email address, the account owner must approve your request before it becomes active in your dashboard.
- The request will show as Pending until approval.
- The account owner can approve/reject it from their My Master Accounts tab.

- Once approved, the status updates to Accepted, and you can access/manage the account.
Add PickMyTrade Account Details – Manage Multiple Accounts Under One Login #
This feature allows you to add and manage multiple trading accounts under a single login. It’s perfect for traders working with multiple prop firms, enabling you to oversee all accounts easily from the “My Clients/Child Accounts” section.
Key Notes: #
- You can create multiple accounts (e.g., 10-15 clients at once).
- Usernames must be unique.
- Email is optional but useful for notifications and direct verification.
- Each account requires a separate subscription.
2. Requesting Access to Existing PickMyTrade Accounts #
Purpose: #
Use this feature to request permission to manage the account of a user who is already registered with PickMyTrade.
Steps: #
- Go to “Request Existing PickMyTrade Account Access” in your dashboard.
- Enter the client’s PickMyTrade-registered email address.
- Click “Request Account Access”.

Process: #
- The user will receive an email notification and can approve/reject it from their account settings.
- Until approved, the status remains “Pending”.
- Once approved, the account appears in your Client/Child Accounts Dashboard.
Approval Requirement (For Requested Accounts): #
If you request access using a client’s email, the account holder must approve the request before you can manage their account.
- Pending requests are shown in your dashboard.
- The client approves/rejects under their My Master Accounts tab.

- Once accepted, your status updates to Approved, and you gain access.
Once Approved, You Can: #
✔ View their Profit and Loss (PNL).
✔ Add their account when generating alerts or using the manual trade copier.
Email Address Input: #
Enter Client/Child PickMyTrade Email Address, then click “Request Account Access”.
3. My Master Account #
Purpose: #
Use this tab to view and manage all admins who have permission to trade on your behalf and check your Profit and Loss (PNL) data.

Features: #
✔ See a list of approved admins who can manage your account.
✔ Review and approve/reject pending access requests.
✔ Revoke access at any time.
4. My Client/Child Accounts Dashboard #
Purpose: #
This dashboard enables you to view and manage all client or child accounts linked to your login.
Includes: #
- Accounts you created (via “Add PickMyTrade Account Details”).
- Accounts you’ve been granted access to (via “Request Existing PickMyTrade Account Access” once approved).
Views Available: #
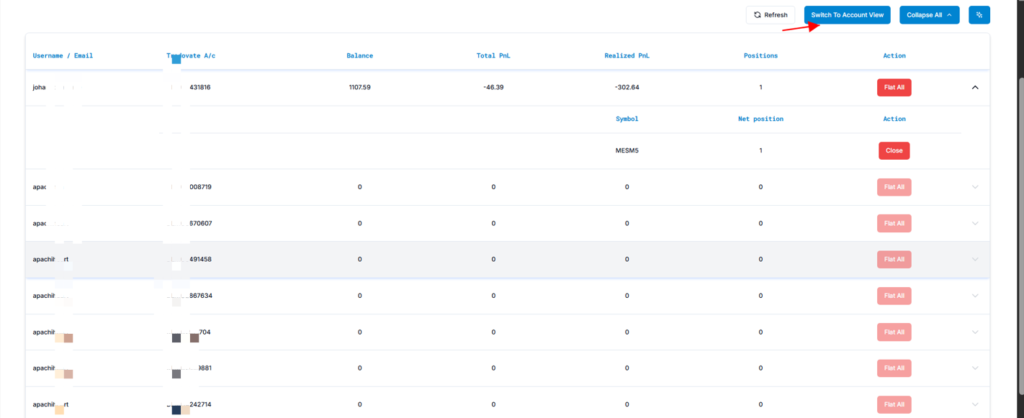
You can now toggle between two distinct views using the top-right button:
- Account View (Default):
- Displays subscription status, expiry, and basic account controls.
- Use this view to manage account access and login/logout easily.
- Position View:
- Shows live trading data for each linked Tradovate account:
- Balance
- Total and Realized PnL
- Open positions (with symbol and quantity)
- Also includes action buttons like Flat All or Close for position management.
- Shows live trading data for each linked Tradovate account:
Switch between these views using the “Switch to Position View” / “Switch to Account View” button at the top.


Real-Time Details Available (in Position View): #
- Account Balance
- Total & Realized Profit and Loss (PnL)
- Current open positions per instrument
- Net position details (symbol, quantity)
Actions Available: #
- Monitor performance and live positions
- Close positions directly (if allowed)
- Adjust account settings (with appropriate permissions)
- Generate reports
Key Notes: #
- Each account requires an active subscription to function.
- Access requests must be approved by the account owner.
- Master Account access grants full management privileges to a third party.
- Use the Collapse/Expand All feature to manage the visibility of account rows for easier navigation.
Understanding Client/Child Account Management Features #
1. Managing Client/Child Accounts #
- After adding a client/child account, you can log in to their account using the “Login” button.
- You can also delete the account using the “Delete” button if needed.

2. Switching Between Accounts #
- Once logged into a child/client account, you can return to your main (admin) account by clicking “Switch to Admin A/c,” as shown in the images.

For support, contact PickMyTrade Helpdesk.
Get Support #
For immediate assistance, please contact our support team
Email: [email protected]
Discord Community: Join & Connect


