1. Introduction #
The Create Settings feature in PickMyTrade allows users to manually configure symbol mapping, order settings, tick sizes, and more. This ensures that all TradingView alerts execute correctly within the Tradovate environment. Use this feature when automatic symbol mapping doesn’t find a match or when custom configurations are needed.
For a visual walkthrough, refer to the accompanying video: #
2. Symbol Mapping in PickMyTrade #
2.1 What is Symbol Mapping? #
TradingView symbols do not always match Tradovate symbols. PickMyTrade automatically maps TradingView symbols to their correct Tradovate equivalents to ensure accurate trade execution.
Example:
- TradingView sends a trade signal for NQ.
- PickMyTrade maps it to NQM5 (the correct Tradovate symbol).
- This ensures that Tradovate understands and executes the trade correctly.
2.2 How to Check Symbol Mapping #
- Navigate to Settings in PickMyTrade.
- Use the Search Bar to check if a symbol is mapped. (Example: Searching for NQ will display its current mapping.)
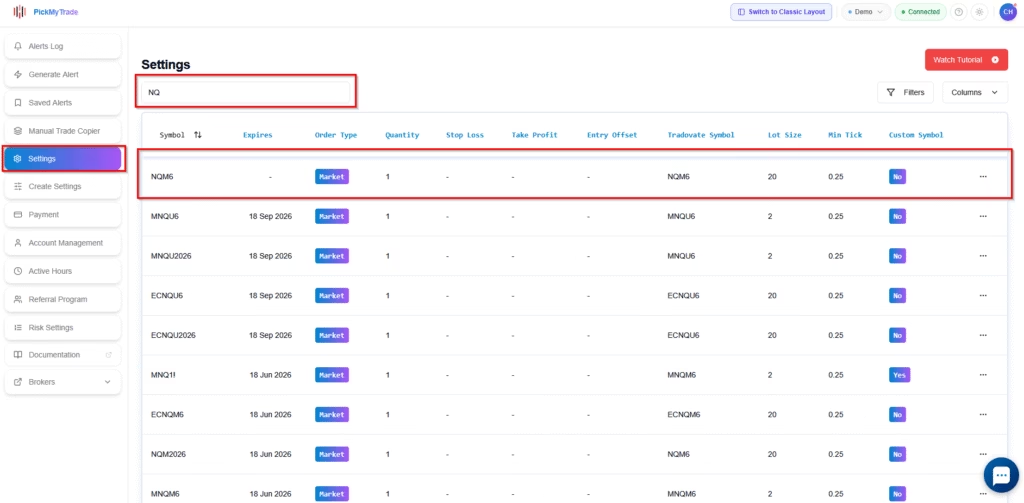
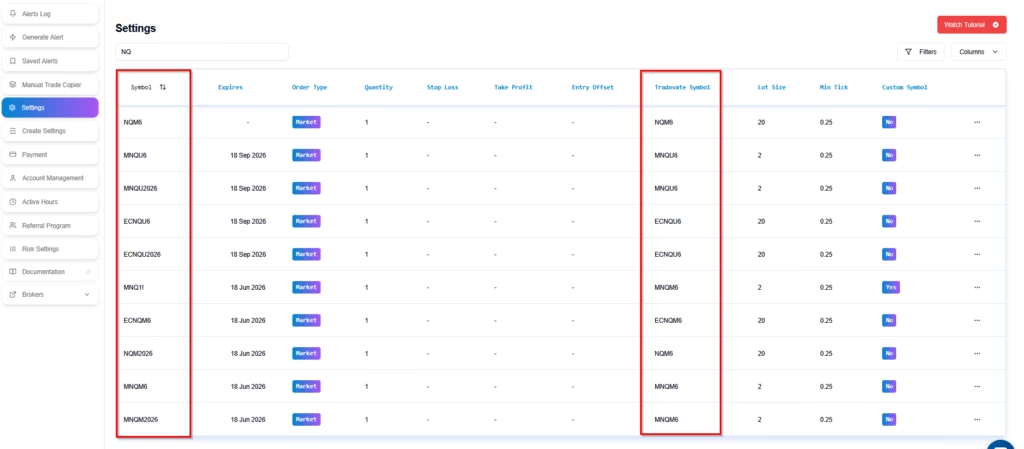
Symbol: Symbols from TradingView
Local Symbol: Symbols from Tradovate
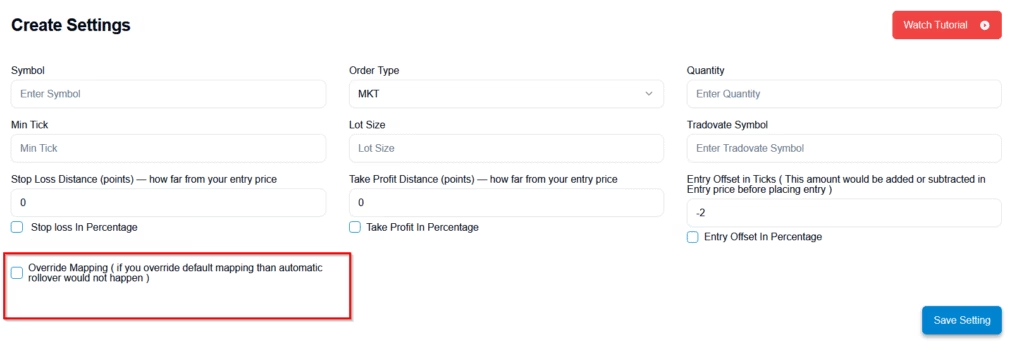
3. Create Settings #
Before trading automation can function correctly, PickMyTrade must recognize the correct symbols, order types, and execution parameters. While Symbol Mapping automatically links TradingView symbols to their Tradovate equivalents, sometimes a symbol may not be found in the mapping. In such cases, you need to manually add it using Create Settings.:
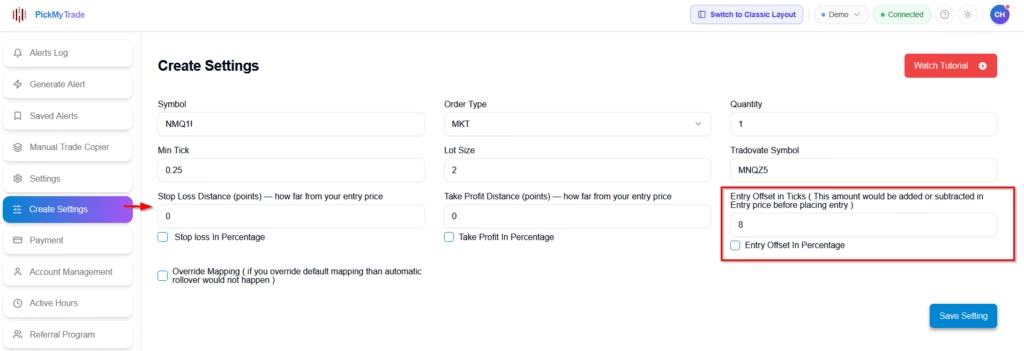
- Navigate to Create Settings: Open PickMyTrade and go to the Create Settings section.
- Click on “Create Settings”: This will open a form where you can enter the required trading parameters.
- Fill in the following fields:
- Symbol: Enter the TradingView symbol (e.g.,
NQ1!). - Order Type: Select the order type (
MKTfor Market Order,LMTfor Limit Order). - Quantity: Define the trade size (e.g.,
1). - Min Tick: Specify the minimum tick size (e.g.,
0.25). - Lot Size: Set the lot size (e.g.,
20). - Tradovate Symbol: Enter the equivalent Tradovate symbol (e.g.,
NQM5). - Stop Loss in Points/USD: Optionally, enter the stop loss in index points not dollars. Actual USD = Points × Lot Size (e.g., 5 pts on NQ = $100). (default: 0)
- Stop Loss in Percentage: Optionally, enter a percentage-based stop loss.
- Take Profit in Points/USD: Optionally, enter the take profit in index points not dollars. Same calculation as Stop Loss above. (default: 0)
- Take Profit in Percentage: Optionally, enter a percentage-based take profit.
- Entry Offset in Ticks: Adjust the entry price by adding or subtracting ticks before order execution (default:
0). - Entry Offset in Percentage: Optionally, define an offset percentage.
- Override Mapping: Enable this if you want to manually control symbol mapping (Note: Auto-Rollover will not work if enabled).
- Symbol: Enter the TradingView symbol (e.g.,
- Save your settings. Once done, these configurations will be applied automatically to incoming trade signals.
4. Stop Loss & Take Profit Configuration #
Key Takeaway: No need to configure SL/TP in settings anymore! They are managed directly in TradingView alerts.
5. Order Types & Entry Offset #
5.1 Order Types Supported #
- Market Order: The default order type.
- Limit Order: Requires additional settings.
5.2 Configuring Limit Orders in PickMyTrade #
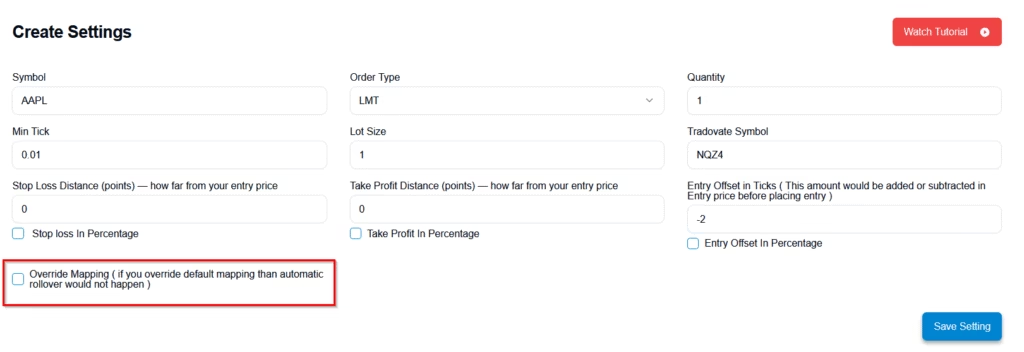
Using a Different Chart Symbol:
- Example: If you’re analyzing Apple (AAPL) but want to place a trade for NQZ4, you can manually set this mapping in settings.
5.3 Setting Order Quantity #
- Define the trade quantity directly in TradingView alerts instead of settings.
5.4 Using Entry Offset for Limit Orders #
What is Entry Offset?
Entry Offset is an optional setting that adjusts the price of a Limit Order relative to the current market price.
Its purpose is to slightly “nudge” your limit order closer to the market so it has a higher chance of being filled — without converting it into a market order.
- A positive offset moves the order toward the market.
- A negative offset moves the order away from the market.
The offset is calculated in ticks.
Example Test Case (MNQ1!):
- Current Price: 24447
- Entry Offset: 8 ticks (2 points)
Buy Limit (LONG)
- Price = Current Price − Offset
- → 24447 − 2 = 24445
Sell Limit (SHORT)
- Price = Current Price + Offset
- → 24447 + 2 = 24449
Key Takeaway: Entry Offset helps place limit orders closer/further from market price, making it act like a “controlled market order”.
6. Override Mapping & Auto-Rollover Settings #
6.1 Override Mapping #
Important: If you enable Override Mapping, Auto-Rollover will NOT work!
What is Override Mapping? It allows you to manually edit symbol mappings, which is useful when trading a different contract than the system’s default mapping.
Example:
- Changing NQZ4 (December 2024) to NQM5 (March 2025) manually.
6.2 How to Enable Override Mapping #
- Go to Settings > Create Settings.
- Enable the “Override Mapping” checkbox to apply manual changes.
- Confirm that the lot size & tick size are correct.
Key Takeaway: If you override a symbol manually, you must update it when the contract expires—Auto-Rollover will NOT happen.
6.3 Auto-Rollover in PickMyTrade #
What is Auto-Rollover? Auto-Rollover automatically updates contracts when they expire.
Example:
- If NQZ4 (December 2024) expires, it will automatically roll over to NQH5 (March 2025).
How Auto-Rollover Works:
- By Default: Auto-Rollover applies automatically four days before contract expiration.
- No Separate Setting: There is no dedicated Auto-Rollover checkbox—it is enabled unless you check “Override Mapping” in the settings.
Important: If you enable Override Mapping, Auto-Rollover will NOT happen.
- Setting Name: “Override Mapping (if you override default mapping then automatic rollover would not happen)”
- Effect: If this box is checked, you are manually controlling the contract mapping, and the system will not automatically roll over contracts.
Handling Open Orders During Rollover
- If Auto-Rollover applies, any new orders will be placed on the new contract.
- However, existing open trades on the old contract must be manually closed.
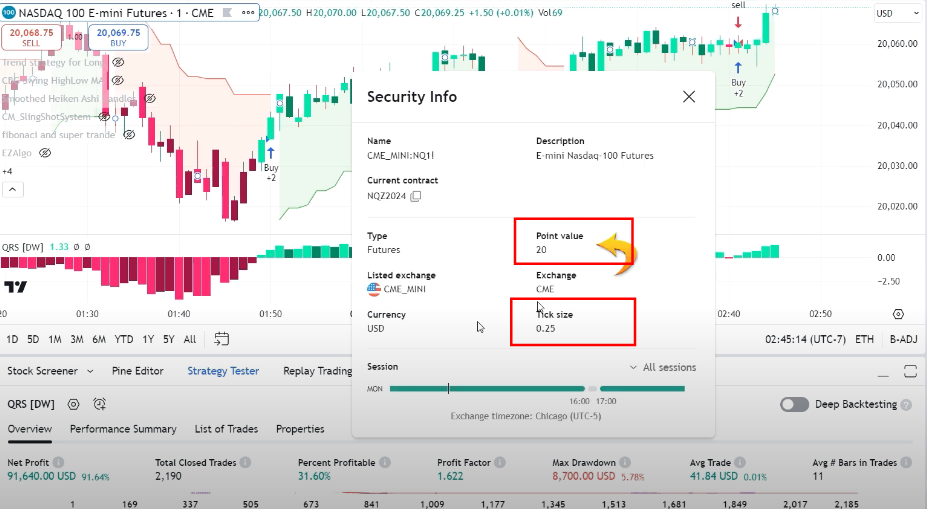
7. Lot Size & Tick Size Configuration #
7.1 Why is Tick Size & Lot Size Important? #
These values define price movements in a futures contract. Incorrect values may result in trade execution errors.
7.2 How to Find Tick Size & Lot Size in TradingView #
- Open TradingView and select the instrument.
- Go to Security Info.
- Note the values:
- Point Value: Lot Size
- Tick Size: Minimum price movement
- Enter these values in PickMyTrade settings.
Key Takeaway: If lot size & tick size don’t match, orders may not execute properly.
Here’s the clean, minimal version that fits naturally with the existing doc style:
7.3 Understanding “Points/USD” in Stop Loss & Take Profit Fields #
The value you enter is in index points, not US dollars. The actual dollar amount depends on your contract’s Lot Size (Point Value).
Formula: Points entered × Lot Size = Actual USD
Example – entering 5 in the SL field:
| Contract | Lot Size | Actual SL |
|---|---|---|
| NQ | $20/pt | $100 |
| MNQ | $2/pt | $10 |
| ES | $50/pt | $250 |
| MES | $5/pt | $25 |
| YM | $5/pt | $25 |
| RTY | $50/pt | $250 |
Key Takeaway: Always verify your Lot Size matches the official CME contract specs before setting any SL/TP values.
8. Final Takeaways #
- If you manually change a contract (Override Mapping), Auto-Rollover will NOT work.
- Auto-Rollover moves trades to the next contract four days before expiration.
- Stop-Loss & Take-Profit are now configured in TradingView alerts, not settings.
More Resources #
Want to automate trades on platforms beyond Rithmic, such as Interactive Brokers, TradeLocker, TradeStation, or ProjectX?
Explore all PickMyTrade setup guides
Using Tradovate instead?
View the Tradovate automation guide
Last updated: May 1, 2026


